

Astrophotography Adventure: Capturing the Crescent Nebula under Switzerland’s Dark Skies
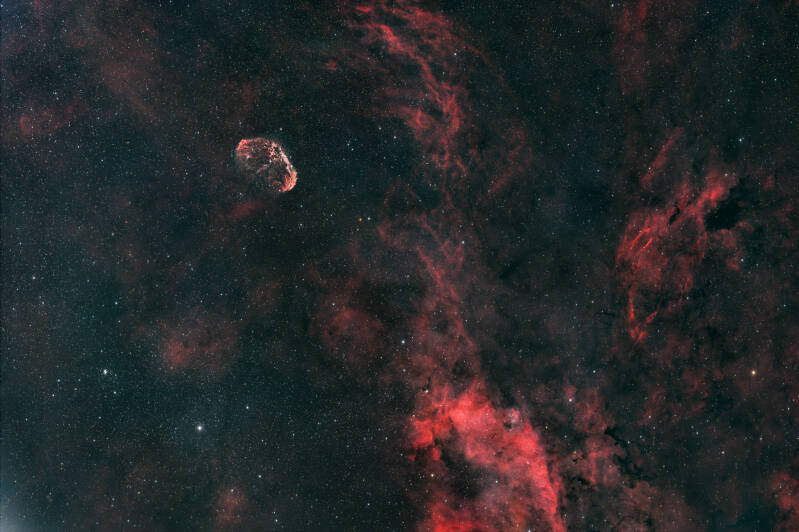
Astrophotography isn’t just a hobby for me — it blends technology, patience, and a touch of magic. On a clear summer night, I set out to capture one of the most fascinating deep‑sky objects visible from the northern hemisphere: the Crescent Nebula (NGC 6888) in the constellation Cygnus.
This emission nebula lies about 5,000 light‑years from Earth and is formed by the powerful stellar wind of a massive Wolf‑Rayet star. Its crescent shape and intricate gas filaments make it a thrilling subject — especially when combined with modern image‑processing techniques.
Planning & Site Selection
The planning began days in advance: I checked weather forecasts, moon phases, and nearby sky conditions. I chose a location near Turbenthal in the canton of Zurich, rated as a Bortle 4 sky — meaning dark skies with minimal light pollution, perfect for capturing fine nebular details.
Arriving about two hours before sunset, the evening temperatures were pleasant, the winds calm, and the sky clear — ideal conditions for astrophotography.
The Setup – My Fast, Compact Rig
I used a compact but powerful setup:
-
Telescope: Celestron RASA 8" – an f/2 Newtonian-style astrograph with no secondary mirror, offering exceptional speed with CMOS cameras.
-
Mount: Skywatcher AZ-EQ6 Pro – a sturdy, precise GoTo mount with ample payload capacity.
-
Camera: ZWO ASI 2600MC Pro – a cooled APS‑C color CMOS sensor, well-suited for widefield deep‑sky imaging.
-
Focuser: ZWO EAF (Electronic Automatic Focuser) – crucial for achieving sharp focus at f/2.
-
Autoguiding: A mini guide‑scope and ZWO guide camera, controlled via ASI Air Plus.
-
Power: A 12 kg lithium‑ion battery capable of powering the setup all night.
Because the RASA is extremely sensitive to focus shifts, the EAF ensures the focal point remains within mere fractions of a millimeter.
Setup & Preparation — Starting the Night
After mounting the scope on the AZ‑EQ6 Pro, I attached the camera to the front of the RASA — at the focal plane where a secondary mirror would normally be. This eliminates optical losses and maximizes light gathering.
All components were connected through the ASI Air Plus control unit, allowing me to operate everything from my mobile phone — perfect if I want to stay warm in the car between exposures.
The setup sequence was:
-
Powering the equipment
-
Balancing the mount
-
Focusing via the EAF
-
Polar alignment using ASI Air
-
Taking a test exposure and performing plate solving
Using the ASI Air’s smartphone app, polar alignment took only a few minutes, delivering precise results — one of its best features.
Exposure & Guiding — The Main Event
Around 11:00 PM, I began the real imaging. The sky was dark and the Crescent Nebula well-positioned in the south. I chose 60-second exposures, since the RASA 8 gathers plenty of light at f/2 in a short time.
The autoguider performed flawlessly, achieving an aggregate RMS error of approximately 0.40 arc-seconds — more than sufficient for crisp 60-second frames at this focal length.
I recorded over 250 images, totaling nearly 4 hours of exposure — an excellent foundation under Bortle 4 skies.
As the camera captured sub-exposures, I rested in the car. Around 4:00 AM, I stepped outside into the stillness — one of the most poignant moments in astrophotography: the Milky Way overhead, crickets chirping below.
Calibration Frames — The Invisible Heroes of Quality
Before packing up, I captured essential calibration frames:
-
Dark frames: same exposure settings as the lights, with the cap in place, to map thermal noise.
-
Flat frames: uniform-field exposures (using a flat panel) to remove vignetting and dust shadows.
-
Bias frames: very short reads (e.g., 0.001 s) to account for sensor readout noise.
These frames are critical for delivering clean, professional-quality images. Without them, artifacts and light pollution gradients remain visible.
Processing — Revealing the Unseen
After transferring the data to my PC, I began processing:
1. Stacking with DeepSkyStacker
DSS combined all light frames using the calibration data, significantly boosting the signal-to-noise ratio — essential for clean, detailed results.
2. Editing in PixInsight
This is where creativity meets science:
-
Remove gradients using DynamicBackgroundExtraction for stray light.
-
Noise reduction, both pre- and post‑stretch.
-
Stretch the image via Histogram Transformation and Curves.
-
Remove stars using StarNet2 to isolate the nebula.
-
Enhance color, contrast, and structural detail.
-
Shrink stars, then recombine them with the nebula.
The entire process took about 1–2 hours, depending on the complexity. For mosaics or narrowband images, it can easily stretch to several hours or days. Learning PixInsight can be challenging at first, but with tutorials and patience, you’ll quickly feel confident — and the results speak for themselves.
Conclusion — Heart, Tech & Cosmic Wonder
Imaging the Crescent Nebula was a memorable experience. A fast, compact setup, dark Swiss skies, and modern processing yielded impressive results in just one night.
What fascinates me most about this hobby is how it blends precision with creativity. You stand under the starry expanse, operate fine technology — and in return, you create images from photons that have traveled thousands of years.
What’s Next?
I’m planning either a mosaic project or narrowband imaging of the Cirrus Nebula next. Let’s see how many clear nights the summer still has in store.
If you’d like to start in astrophotography yourself, have questions about processing, or want general tips — feel free to drop a comment!
Clear skies & happy shooting!
Kommentar hinzufügen
Kommentare